配置consul cluster
Consul是HashiCorp公司推出的开源工具,用于实现分布式系统的服务发现与配置。
官方网站:
https://www.consul.io
https://www.consul.io/docs/commands/
http://demo.consul.io/
功能:
https://www.consul.io/intro/
Service Discovery
Failure Detection
Multi Datacenter
Key/Value Storage

为了简单理解,这里只做单机,暂不做集群!
1.拉取consul镜像
docker pull progrium/consul
提示:目录没有官方出consul镜像,以上consul镜像是星数最高的,也是consul官方推荐的第三方docker image
https://github.com/gliderlabs/docker-consul
2.配置consul server
[root@ela-master1 ~]# docker run -d \
    -p 8400:8400 \
    -p 8500:8500 \
    -p 8600:53 \
    -p 8600:53/udp \
    -h consul \
    --restart=always \
    --name=consul \
    progrium/consul \
    -server \
    -bootstrap \
    -ui-dir=/ui \
    -client 0.0.0.0
参数解释:
-d容器在后台运行, detached mode--restart=always重启模式, always 表示永远-p 8400:8400映射 consul的 rpc 端口8400-p 192.168.123.141:8500:8500映射到公共 IP 这样方便我们使用 UI 界面.-p 172.17.42.1:53:53/udp绑定udp 端口53(默认 DNS端口)在 docker0 bridge 地址上.-p 172.17.42.1:53:53/udp服务对外公布的 IP, 这里特意设置为141, 否则 service 会显示为内部的容器的 IP 地址, 这样就访问不到了.-client 0.0.0.0consul 监听的地址. 附:
附:
安装consul-clientdocker run -d -h node3 \ -p 8300:8300 \ -p 8301:8301 \ -p 8301:8301/udp \ -p 8302:8302 \ -p 8302:8302/udp \ -p 8400:8400 \ -p 8500:8500 \ progrium/consul -advertise 192.168.20.112 -join 192.168.20.113
3.安装registrator registrator 是基于 docker 的 sock 文件来做服务发现的一个第三方的方案, 我试了下, 使用起来非常简单.
[root@ela-node1 ~]# docker run \
    -d \
    --restart=always \
    --name=registrator \
    --net=host \
    -v /var/run/docker.sock:/tmp/docker.sock \
    gliderlabs/registrator \
    -ip 192.168.20.112 \
    consul://192.168.20.113:8500
参数解释:
-v /var/run/docker.sock:/tmp/docker.sock 映射 docker 的 socket 到 container 中的对应位置, 这样 registration 就能监控有哪些服务启动了.
consul://localhost:8500 consul 绑定到本地的 consul 接口上
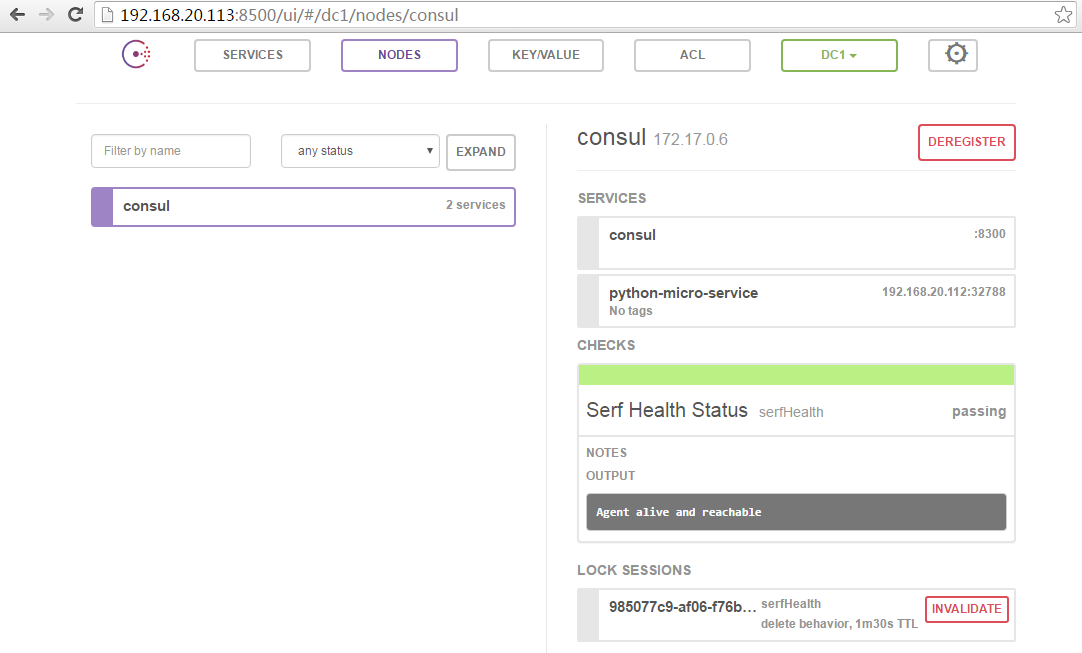
3.查看consul状态(HTTP REST API)
[root@ela-master1 ~]# curl localhost:8500/v1/status/leader
"172.17.0.6:8300"
[root@ela-master1 ~]# curl localhost:8500/v1/status/peers
["172.17.0.6:8300"]
[root@ela-master1 ~]# curl localhost:8500/v1/catalog/services
{"consul":[]}
[root@ela-master1 ~]# curl localhost:8500/v1/catalog/nodes
[{"Node":"consul","Address":"172.17.0.6"}]
4.测试registrator状态获取
1)启动python-micro-service容器。(启动多个,在某个机器或多个机器)
[root@ela-node1 ~]# docker run -d -P --name node1 -h node1 jlordiales/python-micro-service:latest
2)查看状态
[root@ela-master1 ~]# docker logs -f consul
    ...
    2016/08/12 07:37:45 [INFO] raft: Disabling EnableSingleNode (bootstrap)
    2016/08/12 07:38:11 [INFO] agent: Synced service 'node2.docker.com:node1:5000'

[root@ela-master1 ~]# curl localhost:8500/v1/catalog/services
{"consul":[],"python-micro-service":[]}

[root@ela-master1 ~]# curl localhost:8500/v1/catalog/service/python-micro-service| json_reformat
  % Total    % Received % Xferd  Average Speed   Time    Time     Time  Current
                                 Dload  Upload   Total   Spent    Left  Speed
100   194  100   194    0     0  26269      0 --:--:-- --:--:-- --:--:-- 27714
[
    {
        "Node": "consul",
        "Address": "172.17.0.6",
        "ServiceID": "node2.docker.com:node1:5000",
        "ServiceName": "python-micro-service",
        "ServiceTags": null,
        "ServiceAddress": "192.168.20.112",
        "ServicePort": 32787
    }
]

[root@ela-master1 ~]# curl 192.168.20.112:32787
Hello World from node1
Lets now add a new service. We usually want to register all the services that are under our control. But what about the external ones? It is seldom the case where we don’t use any third party services. It would certainly be nice to treat both types equally from a service discovery point of view. We’ll start by adding an external service, following the example given in the documentation:
[root@master ~]# curl -X PUT -d \
'{"Datacenter": "dc1", "Node": "bing", "Address": "www.bing.com", "Service": {"Service": "search", "Port": 80}}' \
http://localhost:8500/v1/catalog/register

[root@master ~]# curl localhost:8500/v1/catalog/services
{"consul":[],"python-micro-service":[],"search":[]}

[root@master ~]# curl localhost:8500/v1/catalog/service/search
[{"Node":"bing","Address":"www.bing.com","ServiceID":"search","ServiceName":"search","ServiceTags":null,"ServiceAddress":"","ServicePort":80}]

[root@master ~]# dig @192.168.20.113 -p 8600 search.service.consul.

; <<>> DiG 9.9.4-RedHat-9.9.4-29.el7 <<>> @192.168.20.113 -p 8600 search.service.consul.
; (1 server found)
;; global options: +cmd
;; Got answer:
;; ->>HEADER<<- opcode: QUERY, status: NOERROR, id: 58972
;; flags: qr aa rd ra; QUERY: 1, ANSWER: 1, AUTHORITY: 0, ADDITIONAL: 0

;; QUESTION SECTION:
;search.service.consul.         IN      A

;; ANSWER SECTION:
search.service.consul.  0       IN      CNAME   www.bing.com.

;; Query time: 2002 msec
;; SERVER: 192.168.20.113#8600(192.168.20.113)
;; WHEN: 五 8月 12 16:00:44 CST 2016
;; MSG SIZE  rcvd: 86
5.使用consul-template来抓取结果
1)安装 consul-template
[root@master ~]# wget https://releases.hashicorp.com/consul-template/0.7.0/consul-template_0.7.0_linux_amd64.zip
[root@master ~]# unzip consul-template_0.7.0_linux_amd64.zip -d /usr/bin/
2)定义模版文件并查看结果
[root@master ~]# cat /tmp/consul.ctmpl
{{range service "python-micro-service"}}\nserver {{.Address}}:{{.Port}}{{end}}
[root@master ~]# consul-template -consul 192.168.20.113:8500 -template /tmp/consul.ctmpl:/tmp/consul.result -dry -once
> /tmp/consul.result
\nserver 192.168.20.112:32788
6.使用DockerFile生成镜像
[root@master nginx]# pwd
/root/nginx
[root@master nginx]# ls
consul-template Dockerfile start.sh
[root@master nginx]# cat Dockerfile
FROM nginx:latest

ENTRYPOINT ["/bin/start.sh"]
EXPOSE 80
VOLUME /templates
ENV CONSUL_URL 192.168.20.113:8500

ADD start.sh /bin/start.sh
RUN rm -v /etc/nginx/conf.d/*
ADD consul-template /usr/local/bin/
#RUN chmod +x /usr/local/bin/consul-template && chmod +x /bin/start.sh

[root@master nginx]# cat start.sh
#!/bin/bash
service nginx start
consul-template -consul=$CONSUL_URL -template="/templates/service.ctmpl:/etc/nginx/conf.d/service.conf:service nginx reload"

[root@master nginx]# docker build -t nginx .
生成镜像
7.利用docker-compose快速运行容器
1)安装docker-compose
# wget https://raw.githubusercontent.com/pypa/pip/master/contrib/get-pip.py
# python get-pip.py
# pip install docker-compose
2)定义模版文件与结果文件
[root@master ~]# cat /tmp/service.ctmpl
upstream python-service {
least_conn;
{{range service "python-micro-service"}}server {{.Address}}:{{.Port}} max_fails=3 fail_timeout=60 weight=1;
{{else}}server 127.0.0.1:65535; # force a 502 {{end}}
}

server {
listen 80 default_server;
charset utf-8;

location / {
proxy_pass http://python-service;
proxy_set_header X-Forwarded-For $proxy_add_x_forwarded_for;
proxy_set_header Host $host;
proxy_set_header X-Real-IP $remote_addr;
}
}
3)定义docker-compose.yml文件
[root@node2 nginx]# vim docker-compose.yml
# This compose file will boot a typical scalable lb-backend  topology.
# Registrator will listen on local docker socks to maintain all published containers. The information will be written to consulserver
# consul-template will listen on consulserver and update local nginx configuration.
nginx:
  #build: ./nginx
  image: nginx:latest
  hostname: nginx
  volumes:
  - "/tmp/service.ctmpl:/templates/service.ctmpl"
  ports:
  - "8080:80"
  restart: always
4)启动容器
[root@node2 nginx]# docker-compose -f docker-compose.yml run -d